Create A New Sequence (Flow Chart)
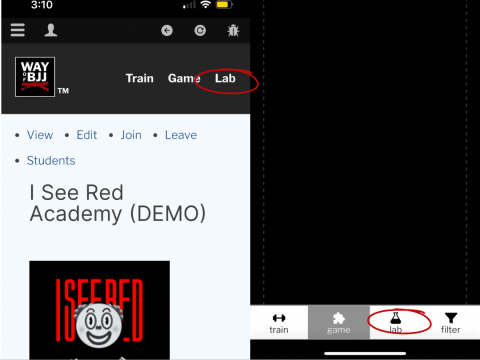
Step 1: Find your LAB
Your LAB serves as the hub for all your creative endeavors and concepts. To initiate a new sequence, begin by accessing your LAB. You can conveniently find it positioned either at the TOP or BOTTOM of your screen.
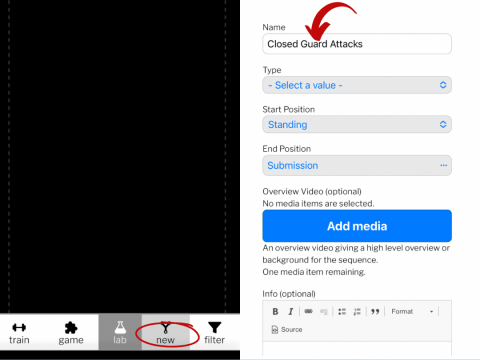
Step 2: Create a New Sequence
Within your LAB, tap on NEW, triggering the "Define Your Sequence" screen to appear. Begin by assigning a name to your sequence.
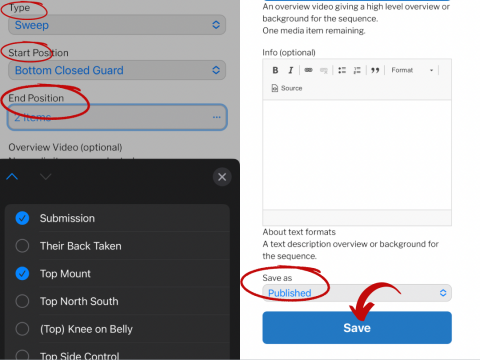
Step 3: Define Your Sequence
- Sequence Type: Choose a sequence type. If uncertain, opt for "transition."
- Start Position: Select the initial position of your sequence.
- End Position: Choose the final position(s) for your sequence. Multiple end positions can be selected if necessary.
- Save As: Scroll to the bottom, change "Save As" to "Published."
- Save: Tap on "Save" to finalize your sequence.
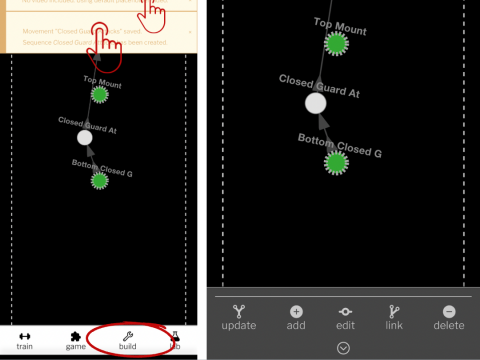
Step 4: Prepare to Create Your Flow Chart
- Close Text Boxes: In the sequencer, tap anywhere on the text boxes to close them.
- Access Builder Menu: Tap on "Build" at the bottom to bring up the "Builder Menu." Here, you can start constructing your flow chart.
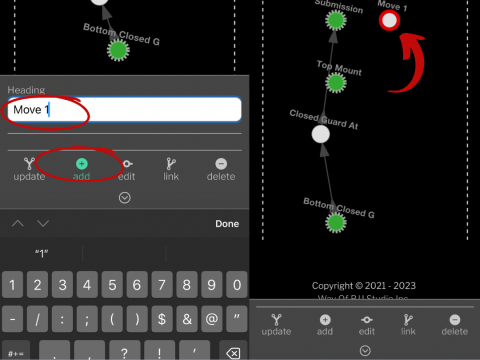
Step 5: Add Your Movements
Add Movements: Tap on "Add," enter the name of the movement, and tap "Add" again to create it. Repeat this process as many times as necessary to create all the movements you want in your flow chart.
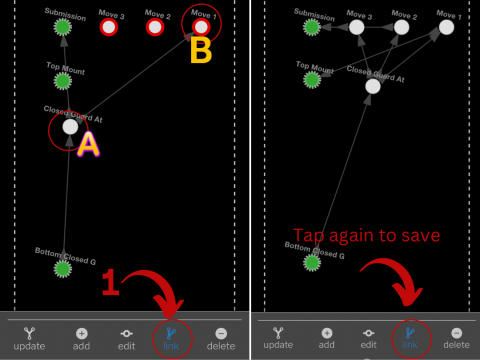
Step 6: Link Your Movements
-
Enter Linking Mode: Tap "Link" to activate linking mode.
-
Create Connections: Tap on Movement A, then tap on Movement B to establish the link, showing the direction of travel from A to B.
-
Unlink If Necessary: To remove a connection, tap on Movement A, then tap on Movement B.
-
Craft Your Flow Chart: Take your time to connect the movements in the desired sequence, ensuring your flow chart represents your intended technique or sequence.
-
Save Your Flow Chart: Once you've created the connections you want, tap on "Link" again to save your meticulously crafted flow chart. Your creation is now preserved and ready to be explored!
-
IMPORTANT: If the "link" button is not highlighted in BLUE, that means you are NOT in link mode. Make sure to TAP on "link" to get into link mode.
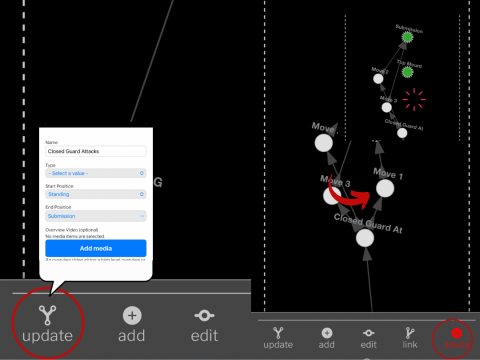
Step 7: Edit Sequence and Delete Movements
-
Editing Sequences: To make changes, tap on "Update" to return to the "Define Your Sequence" page. Here, you can modify the sequence's details, ensuring it is just right.
-
Deleting Movements: If you need to remove a movement, tap "Delete." Then, select the movement you want to delete—it disappears instantly. Tap "Delete" again to confirm and save the changes, keeping your sequence tailored to perfection. NOTE: You can ONLY delete the "white" movements. The GREEN dots are preset positions in the APP and CANNOT be deleted.
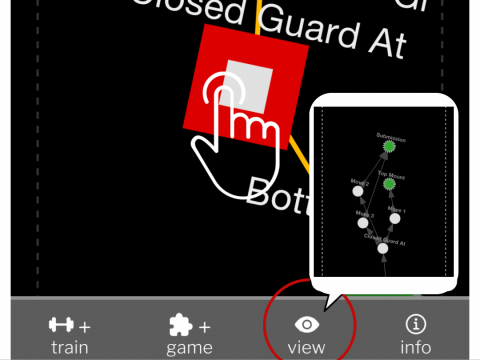
Misc: Finding Your Sequences Again
If you need to find your sequences again, here is how to do it:
-
Go to Your LAB: Navigate to your LAB section, where your creations are stored. Look for your sequence, represented by a square icon.
-
Tap to Access: Simply tap on the square icon. This action opens up a menu where you can choose "View." Tap on "View," and voila! You're back in your sequence, ready to view, edit, or expand upon your work. Happy sequencing!
What's next? Click here to learn how to edit and attach videos to the movements within the sequences